What is this?
It is very easy to find blog posts and articles explaining how to make some of these components work together. They are also completely outdated.
It is not their fault: Kubernetes moves fast, Istio’s development seems to move even faster, and cert-manager breaks backward compatibility. Chances are, by the time you read it it will be too late!
Anyway, in a futile attempt to remain somewhat ahead of the curve, this article was written for Istio-1.6.0-alpha.2. It is fresh!
Feel free to hop straight to the “Tutorial” section, if that’s your thing.
A few useful concepts before we get started
“Gateways” and “Ingress”
Gateways and Ingress are not a 100% match to Kubernetes’ defitinions, so some expectations may be plain wrong. Keep that in mind!
Setting up
It is generally recommended to start with the demo manifest:
cd istio-1.6.0-alpha.2
export PATH=$PWD/bin:$PATH
istioctl manifest apply --set profile=demo
Let’s have a quick looksie:
kubectl get svc -n istio-system
At this stage, we could easily uninstall istio:
istioctl manifest generate --set profile=demo | kubectl delete -f -
# and re-install...
Moving on.
Using a load balancer (spoiler: I will not)
With no load balancer, ingress access can be… challenging.
Let’s say we are using AWS EKS, for instance. This is how we would configure it:
Security (IAM):
{
  "Version": "2012-10-17",
  "Statement": [
    {
      "Effect": "Allow",
      "Action": [
        "autoscaling:DescribeAutoScalingGroups",
        "autoscaling:DescribeLaunchConfigurations",
        "autoscaling:DescribeTags",
        "ec2:DescribeInstances",
        "ec2:DescribeRegions",
        "ec2:DescribeRouteTables",
        "ec2:DescribeSecurityGroups",
        "ec2:DescribeSubnets",
        "ec2:DescribeVolumes",
        "ec2:CreateSecurityGroup",
        "ec2:CreateTags",
        "ec2:CreateVolume",
        "ec2:ModifyInstanceAttribute",
        "ec2:ModifyVolume",
        "ec2:AttachVolume",
        "ec2:AuthorizeSecurityGroupIngress",
        "ec2:CreateRoute",
        "ec2:DeleteRoute",
        "ec2:DeleteSecurityGroup",
        "ec2:DeleteVolume",
        "ec2:DetachVolume",
        "ec2:RevokeSecurityGroupIngress",
        "ec2:DescribeVpcs",
        "elasticloadbalancing:AddTags",
        "elasticloadbalancing:AttachLoadBalancerToSubnets",
        "elasticloadbalancing:ApplySecurityGroupsToLoadBalancer",
        "elasticloadbalancing:CreateLoadBalancer",
        "elasticloadbalancing:CreateLoadBalancerPolicy",
        "elasticloadbalancing:CreateLoadBalancerListeners",
        "elasticloadbalancing:ConfigureHealthCheck",
        "elasticloadbalancing:DeleteLoadBalancer",
        "elasticloadbalancing:DeleteLoadBalancerListeners",
        "elasticloadbalancing:DescribeLoadBalancers",
        "elasticloadbalancing:DescribeLoadBalancerAttributes",
        "elasticloadbalancing:DetachLoadBalancerFromSubnets",
        "elasticloadbalancing:DeregisterInstancesFromLoadBalancer",
        "elasticloadbalancing:ModifyLoadBalancerAttributes",
        "elasticloadbalancing:RegisterInstancesWithLoadBalancer",
        "elasticloadbalancing:SetLoadBalancerPoliciesForBackendServer",
        "elasticloadbalancing:AddTags",
        "elasticloadbalancing:CreateListener",
        "elasticloadbalancing:CreateTargetGroup",
        "elasticloadbalancing:DeleteListener",
        "elasticloadbalancing:DeleteTargetGroup",
        "elasticloadbalancing:DescribeListeners",
        "elasticloadbalancing:DescribeLoadBalancerPolicies",
        "elasticloadbalancing:DescribeTargetGroups",
        "elasticloadbalancing:DescribeTargetHealth",
        "elasticloadbalancing:ModifyListener",
        "elasticloadbalancing:ModifyTargetGroup",
        "elasticloadbalancing:RegisterTargets",
        "elasticloadbalancing:DeregisterTargets",
        "elasticloadbalancing:SetLoadBalancerPoliciesOfListener",
        "iam:CreateServiceLinkedRole",
        "kms:DescribeKey"
      ],
      "Resource": [
        "*"
      ]
    }
  ]
}
Node policy:
{
      "Version": "2012-10-17",
      "Statement": [
          {
              "Effect": "Allow",
              "Action": [
                  "ec2:DescribeInstances",
                  "ec2:DescribeRegions",
                  "ecr:GetAuthorizationToken",
                  "ecr:BatchCheckLayerAvailability",
                  "ecr:GetDownloadUrlForLayer",
                  "ecr:GetRepositoryPolicy",
                  "ecr:DescribeRepositories",
                  "ecr:ListImages",
                  "ecr:BatchGetImage"
              ],
              "Resource": "*"
          }
      ]
  }
The node name is the instance’s private DNS name.
Beware! If you are running Kubernetes on AWS/EC2 rather than leveraging their proprietary container solution, this external load balancer will not be very helpful.
Similarly, installing a bare metal load balancer (metal lb) will not help as it will not have access to a pool of IP addresses.
Node Port approach
So, we installed our manifest. Looks like our gateway will be sitting there, not getting an external IP address.
Let’s retrieve our ports and usable node IP:
export INGRESS_PORT=\
$(kubectl -n istio-system get service istio-ingressgateway \
-o jsonpath='{.spec.ports[?(@.name=="http2")].nodePort}')
export SECURE_INGRESS_PORT=\
$(kubectl -n istio-system get service istio-ingressgateway \
-o jsonpath='{.spec.ports[?(@.name=="https")].nodePort}')
export INGRESS_HOST=\
$(kubectl get po -l istio=ingressgateway -n istio-system \
-o jsonpath='{.items[0].status.hostIP}')
Sidecar Injection
By default, if the matching namespace is correctly labeled, then istio will perform the injection:
kubectl label ns httpbin istio-injection=enabled
But we may wish to perform the injection on a more fine grained level, in an unlabeled namespace. So, let’s instead have istio modify our definition file on the fly:
kubectl apply -f <(istioctl kube-inject -f istio-httpbin.yaml)
Test it (no public route yet):
curl -I -HHost:web.yoursite.com http://$INGRESS_HOST:$INGRESS_PORT/headers
curl -I -HHost:web.yoursite.com http://$INGRESS_HOST:$INGRESS_PORT/status/201pro
So, once the injector is there, things start being properly routed. Yeah.
The ingress in the ingress
So… OK? No. Not OK. We are still using a bogus port. Not proper 80. What’s next, then? Redirections?
For instance:
sudo socat tcp-listen:80,reuseaddr,fork tcp:$INGRESS_HOST:$INGRESS_PORT &
sudo socat tcp-listen:443,reuseaddr,fork tcp:$INGRESS_HOST:$SECURE_INGRESS_PORT &
Do I recommend this? Not really. Am I going to use it for the purpose of this already complex tutorial? You bet!
What changed in 1.5/1.6…?
When configuring our istio profile:
--set values.gateways.istio-ingressgateway.sds.enabled=true doesn’t change anything
--set values.global.k8sIngress.enabled=true enables an auto-generated k8s ingress gateway — this is a LEGACY ingress we do not want anymore. In fact, in 1.6 this option is gone.
Tutorial
In this tutorial, we are going to setup the now well known bookinfo application, demonstrating Istio’s mesh management capabilities:
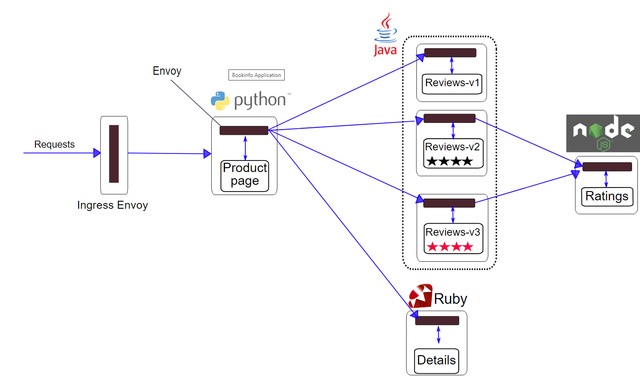
Note: Namespace visibility is very important. If you do not pay attention to it, you will spend hours of hair pulling over this “almost working” situation.
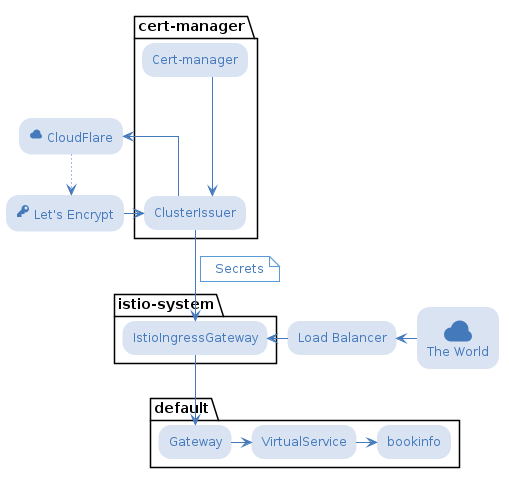
cert-manager
Let’s install cert-manager.
It is possible that the webhook pod will not come up and describe will reveal that it could not find ‘cert-manager-webhook-tls’
In this case, give it a few minutes, then run the command again.
kubectl apply \
	-f https://github.com/jetstack/cert-manager/releases/download/v0.14.2/cert-manager.yaml
kubectl get pods --namespace cert-manager
# Still missing secret after several minutes? Apply again!!!
Optional: test cert-manager with a self-signed certificate
cat <<EOF > test-resources.yaml
apiVersion: v1
kind: Namespace
metadata:
  name: cert-manager-test
---
apiVersion: cert-manager.io/v1alpha2
kind: Issuer
metadata:
  name: test-selfsigned
  namespace: cert-manager-test
spec:
  selfSigned: {}
---
apiVersion: cert-manager.io/v1alpha2
kind: Certificate
metadata:
  name: selfsigned-cert
  namespace: cert-manager-test
spec:
  dnsNames:
    - example.com
  secretName: selfsigned-cert-tls
  issuerRef:
    name: test-selfsigned
EOF
kubectl apply -f test-resources.yaml
kubectl describe certificate -n cert-manager-test
kubectl delete -f test-resources.yaml
We are using the DNS-01 ACME challenge.
Letsencrypt and Cloudflare
Therefore, using the Cloudflare control panel, we create a new token.
Right now, a major limitation is that we need to first list all the zones to retrieve zone id; this requires a token with Read access to all zones; however, if we open the token to all zones it can also ‘Edit’ all DNS entries. In future maybe we should use two tokens, one for each operation.
Anyway, for now, bottom line is: Read all Zones, Edit all DNS entries. Sigh.
Let’s store our token.
When referencing a Secret resource in ClusterIssuer resources (eg apiTokenKeySecretRef) the Secret needs to be in the same namespace as the cert-manager controller pod!!!
cat <<EOF > acme-store-token.yaml
apiVersion: v1
kind: Secret
metadata:
  name: cloudflare-api-token-secret
  namespace: cert-manager
type: Opaque
stringData:
  api-token: your-cloudflare-token
EOF

kubectl apply -f acme-store-token.yaml
Now, create a cluster issuer.
cat <<EOF > acme-issuer.yaml
apiVersion: cert-manager.io/v1alpha2
kind: ClusterIssuer
metadata:
  name: cloudflare-letsencrypt-prod
  namespace: cert-manager
spec:
  acme:
    email: you@yoursite.com
    server: https://acme-v02.api.letsencrypt.org/directory
    privateKeySecretRef:
      name: acme-issuer-account-key
    solvers:
    - dns01:
        cloudflare:
          email: you@yoursite.com
          apiTokenSecretRef:
            name: cloudflare-api-token-secret
            key: api-token
EOF

kubectl apply -f acme-issuer.yaml
Optional: test cert-manager with the ACME challenge
cat <<EOF > test-resources-acme.yaml
apiVersion: v1
kind: Namespace
metadata:
  name: cert-manager-test
---
apiVersion: cert-manager.io/v1alpha2
kind: Certificate
metadata:
  name: acme-cert
  namespace: default
spec:
  dnsNames:
    - web.yoursite.com
  secretName: acme-web-yoursite-secret
  issuerRef:
    name: cloudflare-letsencrypt-prod
    kind: ClusterIssuer
EOF

kubectl apply -f test-resources-acme.yaml
Hello, istio
We can now setup a default istio configuration
istioctl manifest apply
kubectl label namespace default istio-injection=enabled
Let’s also install the bookinfo sample
kubectl apply -f samples/bookinfo/platform/kube/bookinfo.yaml
Let’s get a usable certificate for this app
cat <<EOF > web-yoursite-com-cert.yaml
apiVersion: cert-manager.io/v1alpha2
kind: Certificate
metadata:
  name: istio-web-certs
  namespace: istio-system
spec:
  dnsNames:
    - web.yoursite.com
  secretName: acme-web-yoursite-secret
  issuerRef:
    name: cloudflare-letsencrypt-prod
    kind: ClusterIssuer
EOF

kubectl apply -f web-yoursite-com-cert.yaml
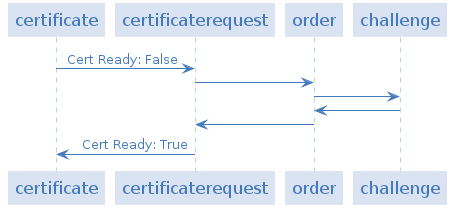
Note: it is easy to check the progress and issues of this certificate’s signing:
kubectl get certificaterequest
kubectl describe certificaterequest {cert request name}
kubectl describe order {order name}
kubectl describe challenge {challenge name}
Ingress
It’s still not reachable. We need to add a virtual service
cat <<EOF > cfr-virtual-service.yaml
apiVersion: networking.istio.io/v1alpha3
kind: VirtualService
metadata:
  name: bookinfo
spec:
  hosts:
  - "web.yoursite.com"
  gateways:
  - bookinfo-gateway
  http:
  - match:
    - uri:
        exact: /productpage
    - uri:
        prefix: /static
    - uri:
        exact: /login
    - uri:
        exact: /logout
    - uri:
        prefix: /api/v1/products
    route:
    - destination:
        host: productpage
        port:
          number: 9080
EOF

kubectl apply -f cfr-virtual-service.yaml
And now the most important piece: our gateway
cat <<EOF > cfr-gateway.yaml
apiVersion: networking.istio.io/v1alpha3
kind: Gateway
metadata:
  name: bookinfo-gateway
  namespace: default
spec:
  selector:
    istio: ingressgateway
  servers:
  - port:
      number: 443
      name: httpz-bookinfo
      protocol: HTTPS
    hosts:
    - "web.yoursite.com"
    tls:
      credentialName: acme-web-yoursite-secret
      mode: SIMPLE
      privateKey: sds
      serverCertificate: sds
EOF

kubectl apply -f cfr-gateway.yaml
Check that our gateway is alive and well
kubectl -n istio-system describe pod/istio-ingressgateway-{etc}
kubectl -n istio-system logs pod/istio-ingressgateway-{etc}
Finally, since we do not have an actual load balancer available, let’s add some port forwarding:
export INGRESS_PORT=$(kubectl -n istio-system get service istio-ingressgateway -o jsonpath='{.spec.ports[?(@.name=="http2")].nodePort}')
export SECURE_INGRESS_PORT=$(kubectl -n istio-system get service istio-ingressgateway -o jsonpath='{.spec.ports[?(@.name=="https")].nodePort}')
export INGRESS_HOST=$(kubectl get po -l istio=ingressgateway -n istio-system -o jsonpath='{.items[0].status.hostIP}')

sudo socat tcp-listen:443,reuseaddr,fork tcp:$INGRESS_HOST:$SECURE_INGRESS_PORT &
sudo socat tcp-listen:80,reuseaddr,fork tcp:$INGRESS_HOST:$INGRESS_PORT &
Footnotes
Note:the clusterissuer has no selector, therefore it is used to issue certs for everyone! We could have been more subtle:
selector:
        matchLabels:
          "use-cloudflare-solver": "true"
          "email": "user@example.com"
selector:
        dnsNames:
        - 'example.com'
        - '*.example.com'
selector:
        dnsZones:
        - 'example.com'
Could we now update its gateway so that is supports both TLS and not TLS? Yes:
cat <<EOF > cfr-gateway.yaml
apiVersion: networking.istio.io/v1alpha3
kind: Gateway
metadata:
  name: bookinfo-gateway
  namespace: default
spec:
  selector:
    istio: ingressgateway
  servers:
  - port:
      number: 443
      name: httpz-bookinfo
      protocol: HTTPS
    hosts:
    - "web.yoursite.com"
    tls:
      credentialName: acme-web-yoursite-secret
      mode: SIMPLE
      privateKey: sds
      serverCertificate: sds
  - port:
      number: 80
      name: http-bookinfo
      protocol: HTTP
    hosts:
    - "web.yoursite.com"
EOF
But could we redirect http to https? Yes using tls/httpsRedirect
cat <<EOF > cfr-gateway.yaml
apiVersion: networking.istio.io/v1alpha3
kind: Gateway
metadata:
  name: bookinfo-gateway
  namespace: default
spec:
  selector:
    istio: ingressgateway
  servers:
  - port:
      number: 443
      name: httpz-bookinfo
      protocol: HTTPS
    hosts:
    - "web.yoursite.com"
    tls:
      credentialName: acme-web-yoursite-secret
      mode: SIMPLE
      privateKey: sds
      serverCertificate: sds
  - port:
      number: 80
      name: http-bookinfo
      protocol: HTTP
    tls:
      httpsRedirect: true
    hosts:
    - "web.yoursite.com"
EOF
The Big Undo
sudo killall socat
for app in productpage reviews ratings details; do
	kubectl delete all -l app=$app -n default
done
kubectl delete ns cert-manager istio-system
CRDNAME=istiooperators.install.istio.io
for a in $(k get crd | grep istio | awk '{print $1}'); do k delete crd $a; done
kubectl patch crd/${CRDNAME} -p '{"metadata":{"finalizers":[]}}' --type=merge
for a in $(k get crd | grep cert-manager | awk '{print $1}'); do k delete crd $a; done
Comments powered by Talkyard.